Jump to navigation

  •  
  •  
  •  

  • Courses
  • Resources
  • Case study
  • Showcase
  • Tools
  • Gallery
  • Videos

Search form

Animation Design Communication Design Design Fundamentals Interaction Design Product Design Tools for Design Open Design
Home / Resources / Pumice Stone Art - Nagpur, Maharashtra / Making Process

.

top unblocked 76 games free access unblocked games 76 now latest unblocked online games kays games unblocked access retro bowl unlimited play play retro bowl without block cool math brain games free school-friendly unblocked games yohoho io game online lesson guru hack and help play baseball bros unblocked classroom 6x games to play 76
Design Resource

Pumice Stone Art - Nagpur, Maharashtra

Gift worthy item
by
Prof. Bibhudutta Baral and Srikanth B.
NID, Bengaluru
Making Process
 
  • Printer-friendly version

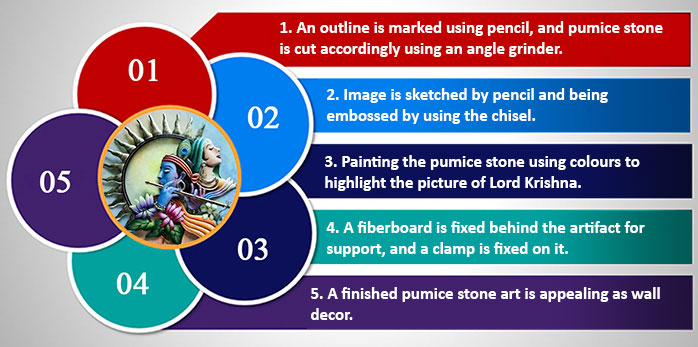
To start with, a quality pumice block is chosen by the artisan. Then after drawing an indented shape over it with a pencil, the block is cut into the shape using an angle grinder. Now the artisan sketches an image on the new ground stone and carves depths with a chisel. A screwdriver is also used as a smaller chisel for sculpting thinner and smaller details on the stone.  After sculpting the stone, dust is brushed off to check the details of the sculpture. Once the artist is satisfied with the obtained results, he/she then moves to the painting part. Paints are squeezed out on a painting pallet and are mixed with a round brush to form multiple gradients required for the art. Artisan then uses a fine brush to paint the details on the stone. The carvings and the paintings together give depth to the craft, along with an embossing effect. After completing the painting on stone, it is left for drying, which takes almost an hour. As the artisan finishes with the decoration of the stone, they then proceed to fix a fiberboard cut in the exact shape of the designed stone, using a strong adhesive. After the board is stuck tightly to the stone, a clamp that enables easy hanging to a wall is attached behind the board with the help of small screws. Once all these steps are correctly executed, the pumice stone art is ready to use.

Flowchart:


col-sm-4
col-sm-4
col-sm-4
col-sm-4
col-sm-4
col-sm-4
col-sm-4
col-sm-4
col-sm-4
col-sm-4
col-sm-4
col-sm-4
col-sm-4
col-sm-4
col-sm-4
col-sm-6
col-sm-6

‹ › ×

    • Introduction
    • Tools and Raw Materials
    • Making Process
    • Products
    • Video
    • Downloads
    • Contact Details
    • Credits

    Creating Digital-learning Environment for Design


    • Courses
    • Resources
    • Case study
    • Showcase
    • Tools
    • Gallery
    • Videos
    • Animation Design
    • Communication Design
    • Design Fundamentals
    • Interaction Design
    • Product Design
    • Tools for Design
    • Open Design
    • Contribute to our Dsource
    • About
    • People
    • Events
    • Job@D'source
    • Contact Us
    • Privacy Policy
    • Download App
    • YouTube
    • Facebook
    • Twitter

    Indian Language
    English Bangali Gujarati Hindi
    Kannada Malayalam Marathi Punjabi
    Sindhi Tamil Telugu Urdu