Design Resource
Marble Stone Carving - Varanasi
The Skillful Crafts in Stone
by
Prof. Bibhudutta Baral and Ranjitha M. C.
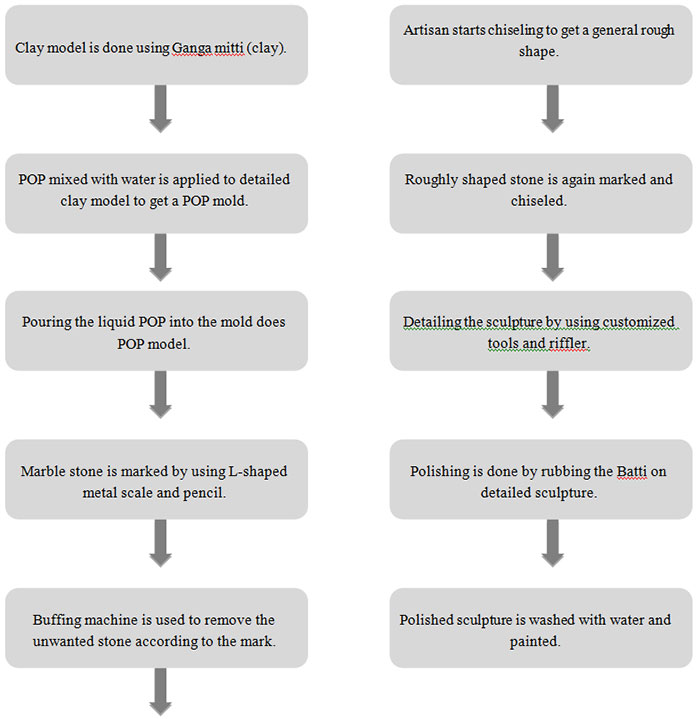
Marble stone, Ganga mitti and POP (Plaster of Paris) are the basic raw materials. Initially artisan draws the required copy on white paper and then starts with clay modeling according to the model reference and required size. Ganga Matti (clay) is used for clay modeling by checking whether it is useful or not. Artisan details the clay model by adding and removing extra clay. The clay model will be done in 3 to 4 days by not letting it to dry. Then the mixture of POP (plaster of Paris) and water (1ltr of water and 2kg POP) is applied to the detailed clay model to get a mold and then the liquid POP is poured to the 3D mold for POP model.
The marble stone is measured using L-shaped metal scale and marked with a pencil. Then the rough shape is given to the marble by removing large unwanted marble chunks using buffing machine and pitching tool according to the reference (POP model). Artisan starts to chisel out the stone by placing the point of the pitching tool against a preferred part of the stone and strikes the hammer with controlled strokes. Once done with the general rough shape, artisan uses other tools to refine the rough figure. The claw chisel is used to create parallel lines in the stone to add texture to the figure. At this stage artisan mark the removal area with a pencil and generally maintains a thinner stroke.
Gradually the sculptor changed the rough stone block into general shape of the statue. Detailing the sculpture requires dedication and patience. At this stage artisan starts detailing the sculpture using customized tools and riffler. Polishing is the last process of marble carving. Marble polishing stone called ‘batti’ which is available in local market of Varanasi is used to polish the marble sculpture. Artisan rubs the batti by pouring water to the sculpture to get a neat finish. Marble has the capability to take a high polish. Finally the polished sculpture is washed with clean water. Artisan start to paint the sculpture with the customer’s interest. Enamel or oil based paints and round brushes are used to paint the sculpture.
Flow Chart:


