D'Source
Published on D'Source (http://dsource.idc.iitb.ac.in)

Home > Print > Course > Basic Texturing Part 1 > Creating UV Mapping > Creating UV Mapping


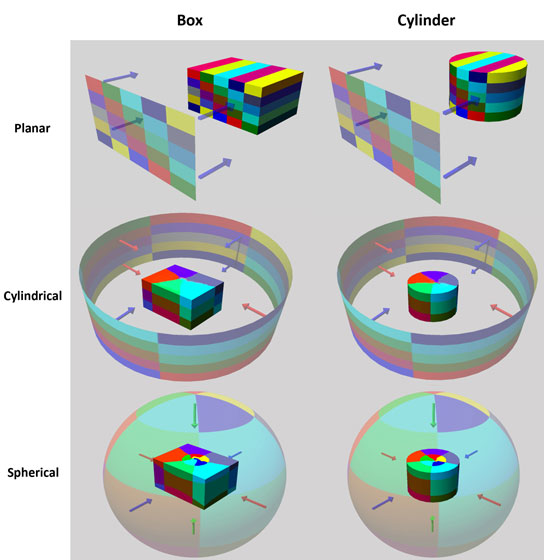
You can use planar, cylindrical and spherical mapping for other objects too.  The difference with this and the above examples is in the way the UV map is created.

Let us take the example of Planar mapping. The object to be mapped does not need to be a plane like the faces of the box. Instead, the image is projected from a plane onto the object to which the mapping is applied.

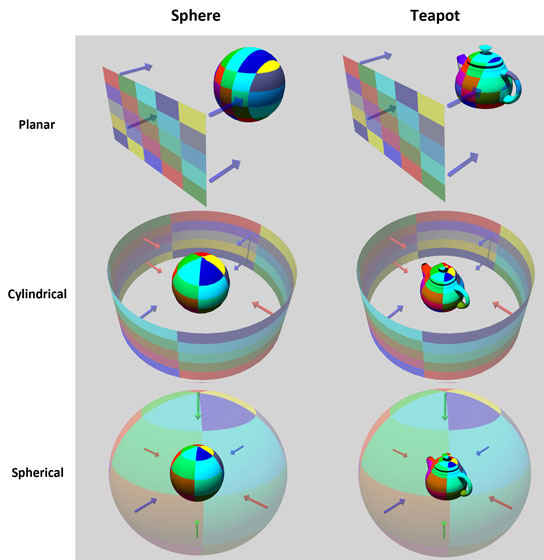
Given below are the comparisons of the 3 types of mapping for different objects. Study them closely and understand their differences.

Notice how on surfaces curving away from the projection plane or surfaces perpendicular to it, the texture is stretched. Similarly, for Cylindrical Mapping, the texture image is projected inwards from a cylinder onto the object. This can be any object and not necessarily a cylinder and so too for Spherical Mapping.


In the bottle example shown in the video, we have created UV mapping for the bottle using Cylindrical Mapping. The label is wrapped or printed around the bottle and a cylindrical map would be quite accurate for it.
 

Besides texture mapping the colour of the object, there are many surface properties that make the final image created by a 3D software look real. The ‘Material’ applied to the object will have to recreate all of them. For example, the shininess and glossiness of the surface, the roughness and ups and downs in the surface, transparency, reflection, refraction …. the list goes on.
 
Observe different surfaces of objects around you and try and identify the different properties of that surface. We will look at this in more detail in the next part.
 
 
Powered by Drupal

Source URL:http://dsource.idc.iitb.ac.in/course/basic-texturing-part-1/creating-uv-mapping